Oracle Data Service Integrator Documentation > Data Services Developer's Guide
How To Test an Update Procedure
This topic describes how to test an Update procedure in Test view in Workshop for WebLogic.
Configure Audit Properties
To test an Update procedure in Workshop for WebLogic, you must submit a data graph in the Parameters box in Test view. A data graph is an XML structure with a root element of <sdo:datagraph> and a <changesummary> element. The easiest way to submit a data graph is to capture one from an audit.
First, configure audit properties in the Oracle Data Service Integrator Console.
Configuring Audit Properties in the Oracle Data Service Integrator Console
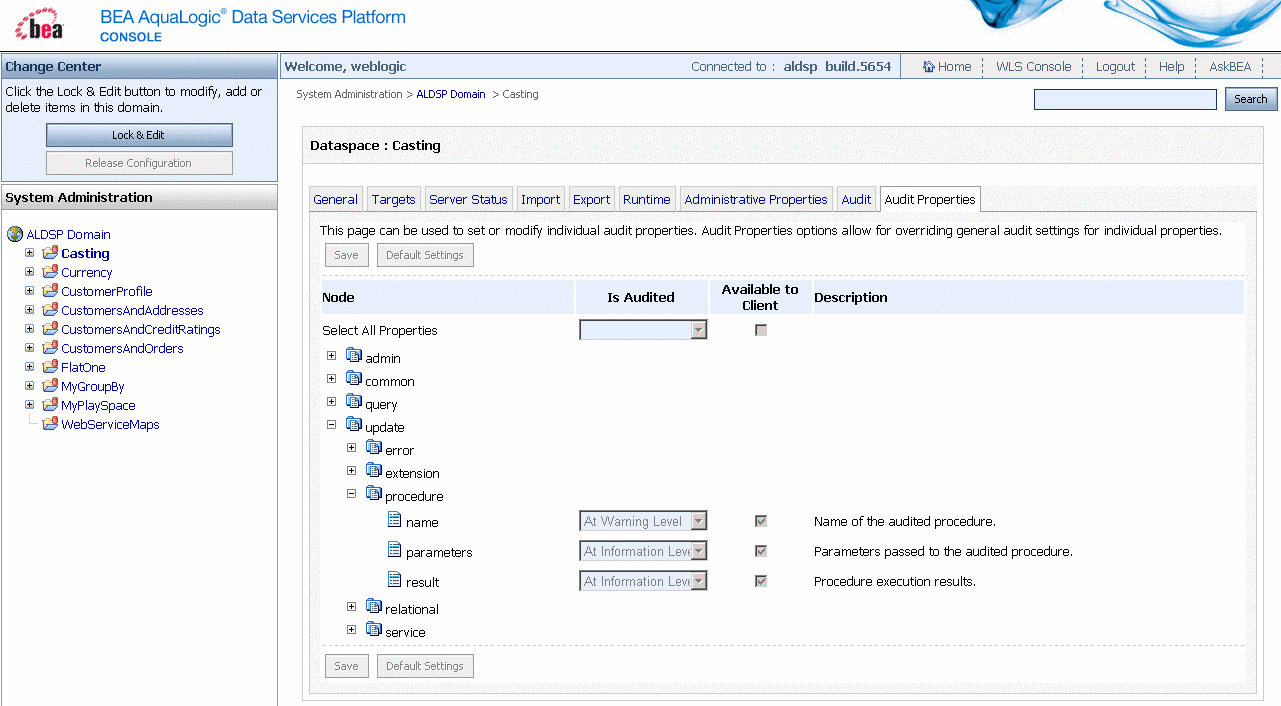
To configure audit properties so that Oracle Data Service Integrator generates data graphs:
- Open the Oracle Data Service Integrator Console and log in.
- Click the name of a data space project.
- Click the Audit Properties tab.
- Click Lock & Edit in the upper left pane.
- Navigate to the Update > Service node (be careful not to move to Update > Error > Procedure).
- For Name, Parameters, and Result, choose Always from the Is Audited menu.
- Click Save.
- Click Activate Changes in the upper left pane.
Capture the Data Graph
You can then capture a data graph from the audit messages displayed in the Workshop for WebLogic Console tab, and edit the data graph to submit to the Update procedure in Test view.
Viewing a Data Graph in the Workshop for WebLogic Console Tab
To capture a data graph:
- Open a logical data service in Workshop for WebLogic.
- Click the Test tab.
- Choose the service's primary Read function, then click Run.
- Click Edit, edit a value, then click Submit.
- (Optional) Check the Workshop for WebLogic Console tab.
If you see the Oracle WebLogic Server console data, not the Oracle Data Service Integrator console data, click the drop-down arrow next to the console icon , and choose Oracle Data Service Integrator Console.
 - Scroll up in the Workshop for WebLogic Console tab until you locate the data graph, right-click, and copy it.
Submit the Update
When you update relational sources, the SDO update mechanism uses optimistic locking to avoid change conflicts. With optimistic locking, the data source is not locked when the SDO client acquires the data. Later, when the client wants to update, the data in the source is compared to a copy of the data at a time when it was acquired. If there are discrepancies, the update is not committed. Before you submit the data graph to the Update procedure, be sure that optimistic locking is enabled in the underlying data source you are updating.
You can then submit the data graph to the Update procedure. However, you may need to edit it, as the data graph you captured from the Workshop for WebLogic Console tab reflected the last change you made, not the change you are presently submitting to the Update procedure.
Submitting the Data Graph to the Update Procedure
The data graph you submit to the Update procedure takes the place of the return type as an argument, even if you are updating only some of the elements in the return type.
To submit the data graph to an Update procedure:
- Enable optimistic locking on any physical relational data sources the data graph is updating.
- Open a data service in Workshop for WebLogic, and click the Test tab.
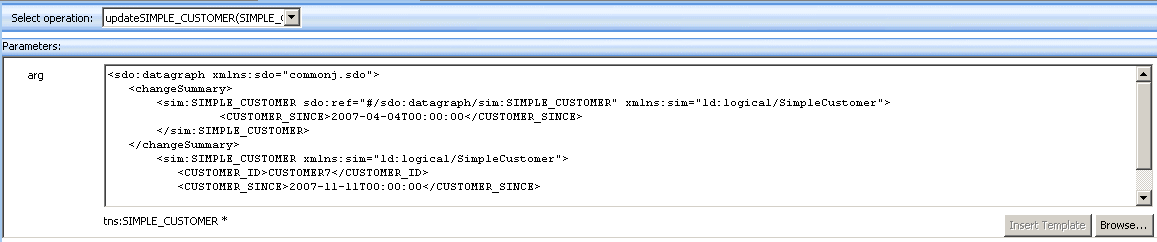
- At Select Operation, choose an Update procedure.
- Copy a data graph you have captured from the Workshop for WebLogic Console tab to the Parameters box.
- Edit the data graph for the change you want to make.
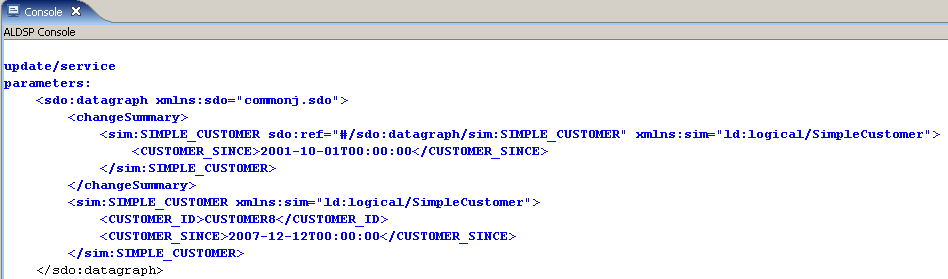
The data graph you captured applies to a change made in the visual interface. Update the change summary to the values the object presently has, and the remaining elements to the new values you want to set. For example, this is a change summary captured from the Workshop for WebLogic Console tab:
<sdo:datagraph xmlns:sdo="commonj.sdo">
  <changeSummary>
      <sim:SIMPLE_CUSTOMER sdo:ref="#/sdo:datagraph/sim:SIMPLE_CUSTOMER" xmlns:sim="ld:logical/SimpleCustomer">
      <CUSTOMER_SINCE>1999-01-01T00:00:00</CUSTOMER_SINCE>
      </sim:SIMPLE_CUSTOMER>
  </changeSummary>
  <sim:SIMPLE_CUSTOMER xmlns:sim="ld:logical/SimpleCustomer">
      <CUSTOMER_ID>CUSTOMER7</CUSTOMER_ID>
      <CUSTOMER_SINCE>2007-11-11T00:00:00</CUSTOMER_SINCE>
  </sim:SIMPLE_CUSTOMER>
</sdo:datagraph>
This version has been updated in the Parameters box (note the difference in the CUSTOMER_SINCE dates):
<sdo:datagraph xmlns:sdo="commonj.sdo">
  <changeSummary>
      <sim:SIMPLE_CUSTOMER sdo:ref="#/sdo:datagraph/sim:SIMPLE_CUSTOMER" xmlns:sim="ld:logical/SimpleCustomer">
      <CUSTOMER_SINCE>2007-11-11T00:00:00</CUSTOMER_SINCE>
      </sim:SIMPLE_CUSTOMER>
  </changeSummary>
  <sim:SIMPLE_CUSTOMER xmlns:sim="ld:logical/SimpleCustomer">
      <CUSTOMER_ID>CUSTOMER7</CUSTOMER_ID>
      <CUSTOMER_SINCE>2008-04-04T00:00:00</CUSTOMER_SINCE>
  </sim:SIMPLE_CUSTOMER>
</sdo:datagraph>
- Click Run. You should see this message in Test view:
Operation was successful.
See Also
Concepts
- Brief Overview of Service Data Objects (for Workshop for WebLogic)
- Data Programming Model and Update Framework (in depth, for client applications)